Google BigQuery Workload Identity Federation
Authenticating to Google BigQuery using WIF
Workload Identity Federation (WIF) lets you connect Polytomic to Google BigQuery without managing service account keys. Instead, your Google Cloud project trusts Polytomic's AWS identity directly, eliminating the need to create, download, rotate, and secure long-lived JSON key files.
Prerequisites
- A Google Cloud project with the BigQuery API and IAM Service Account Credentials API enabled.
- Permission to create Workload Identity Pools in your Google Cloud project (requires
roles/iam.workloadIdentityPoolAdmin) - A Google Cloud service account with the BigQuery roles your Polytomic syncs require.
Configuration Steps
1. Create a Workload Identity Pool
In the Google Cloud Console:
- Go to IAM & Admin → Workload Identity Federation.
- Click Create Pool.
- Name the pool (e.g.,
polytomic-pool) and give it an optional description. - Click Continue.
Or via gcloud:
gcloud iam workload-identity-pools create polytomic-pool \
  --location="global" \
  --display-name="Polytomic"
2. Add an AWS Provider to the Pool
- In the pool you just created, click Add Provider.
- Select AWS as the provider type.
- Enter Polytomic's AWS account ID:
568237466542Contact Polytomic support at [email protected] for an execution role ARN if you would like to restrict access further.
- Click Continue.
- Click Save.
Or via the gcloud command-line tool:
gcloud iam workload-identity-pools providers create-aws polytomic-aws \
  --location="global" \
  --workload-identity-pool="polytomic-pool" \
  --account-id="568237466542" \
3. Grant Service Account Impersonation
The Workload Identity Pool needs permission to act as a GCP service account. This is the service account whose BigQuery permissions Polytomic will use.
-
In your Google Cloud console, go to IAM & Admin → Service Accounts.
-
Select (or create) the service account you want Polytomic to use for BigQuery access.
-
Click the Permissions tab, then go to Grant Access.
-
In the New principals field, enter:
principalSet://iam.googleapis.com/projects/PROJECT_NUMBER/locations/global/workloadIdentityPools/polytomic-pool/*Replace
PROJECT_NUMBERwith your Google Cloud project number (found on the project dashboard). -
Assign the role Workload Identity User (
roles/iam.workloadIdentityUser). -
Click Save.
Or via the gcloud CLI:
gcloud iam service-accounts add-iam-policy-binding \
  SA_EMAIL@PROJECT_ID.iam.gserviceaccount.com \
  --role="roles/iam.workloadIdentityUser" \
  --member="principalSet://iam.googleapis.com/projects/PROJECT_NUMBER/locations/global/workloadIdentityPools/polytomic-pool/*"
4. Ensure the Service Account Has BigQuery Permissions
The service account must have the appropriate BigQuery roles. At minimum:
- BigQuery Data Viewer (
roles/bigquery.dataViewer) — to read data - BigQuery Job User (
roles/bigquery.jobUser) — to run queries - BigQuery Data Editor (
roles/bigquery.dataEditor) — if using Polytomic to write to BigQuery
If you use the Extract option for bulk reads, also grant:
- Storage Object Admin (
roles/storage.objectAdmin) on the GCS bucket used for extraction
5. Download the Credential Configuration File
-
In the Google Cloud Console, go to IAM & Admin → Workload Identity Federation.
-
Select your pool, then select the AWS provider.
-
Click Connected Service Accounts, then select your service account.
-
Click Download Config and choose the format Credential Configuration File.
-
Save the downloaded JSON file. It will look similar to:
{
  "type": "external_account",
  "audience": "//iam.googleapis.com/projects/PROJECT_NUMBER/locations/global/workloadIdentityPools/polytomic-pool/providers/polytomic-aws",
  "subject_token_type": "urn:ietf:params:aws:token-type:aws4_request",
  "service_account_impersonation_url": "https://iamcredentials.googleapis.com/v1/projects/-/serviceAccounts/SA_EMAIL:generateAccessToken",
  "token_url": "https://sts.googleapis.com/v1/token",
  "credential_source": {
    "environment_id": "aws1",
    "region_url": "http://169.254.169.254/latest/meta-data/placement/availability-zone",
    "url": "http://169.254.169.254/latest/meta-data/iam/security-credentials",
    "regional_cred_verification_url": "https://sts.{region}.amazonaws.com?Action=GetCallerIdentity&Version=2011-06-15"
  }
}
Important: This file does not contain secrets. It only describes how to perform the token exchange. The actual authentication happens at runtime using Polytomic's AWS IAM identity.
6. Configure the Connection in Polytomic
- In Polytomic, go to Connections → Add Connection → Google BigQuery.
- Authentication method to Workload Identity Federation:
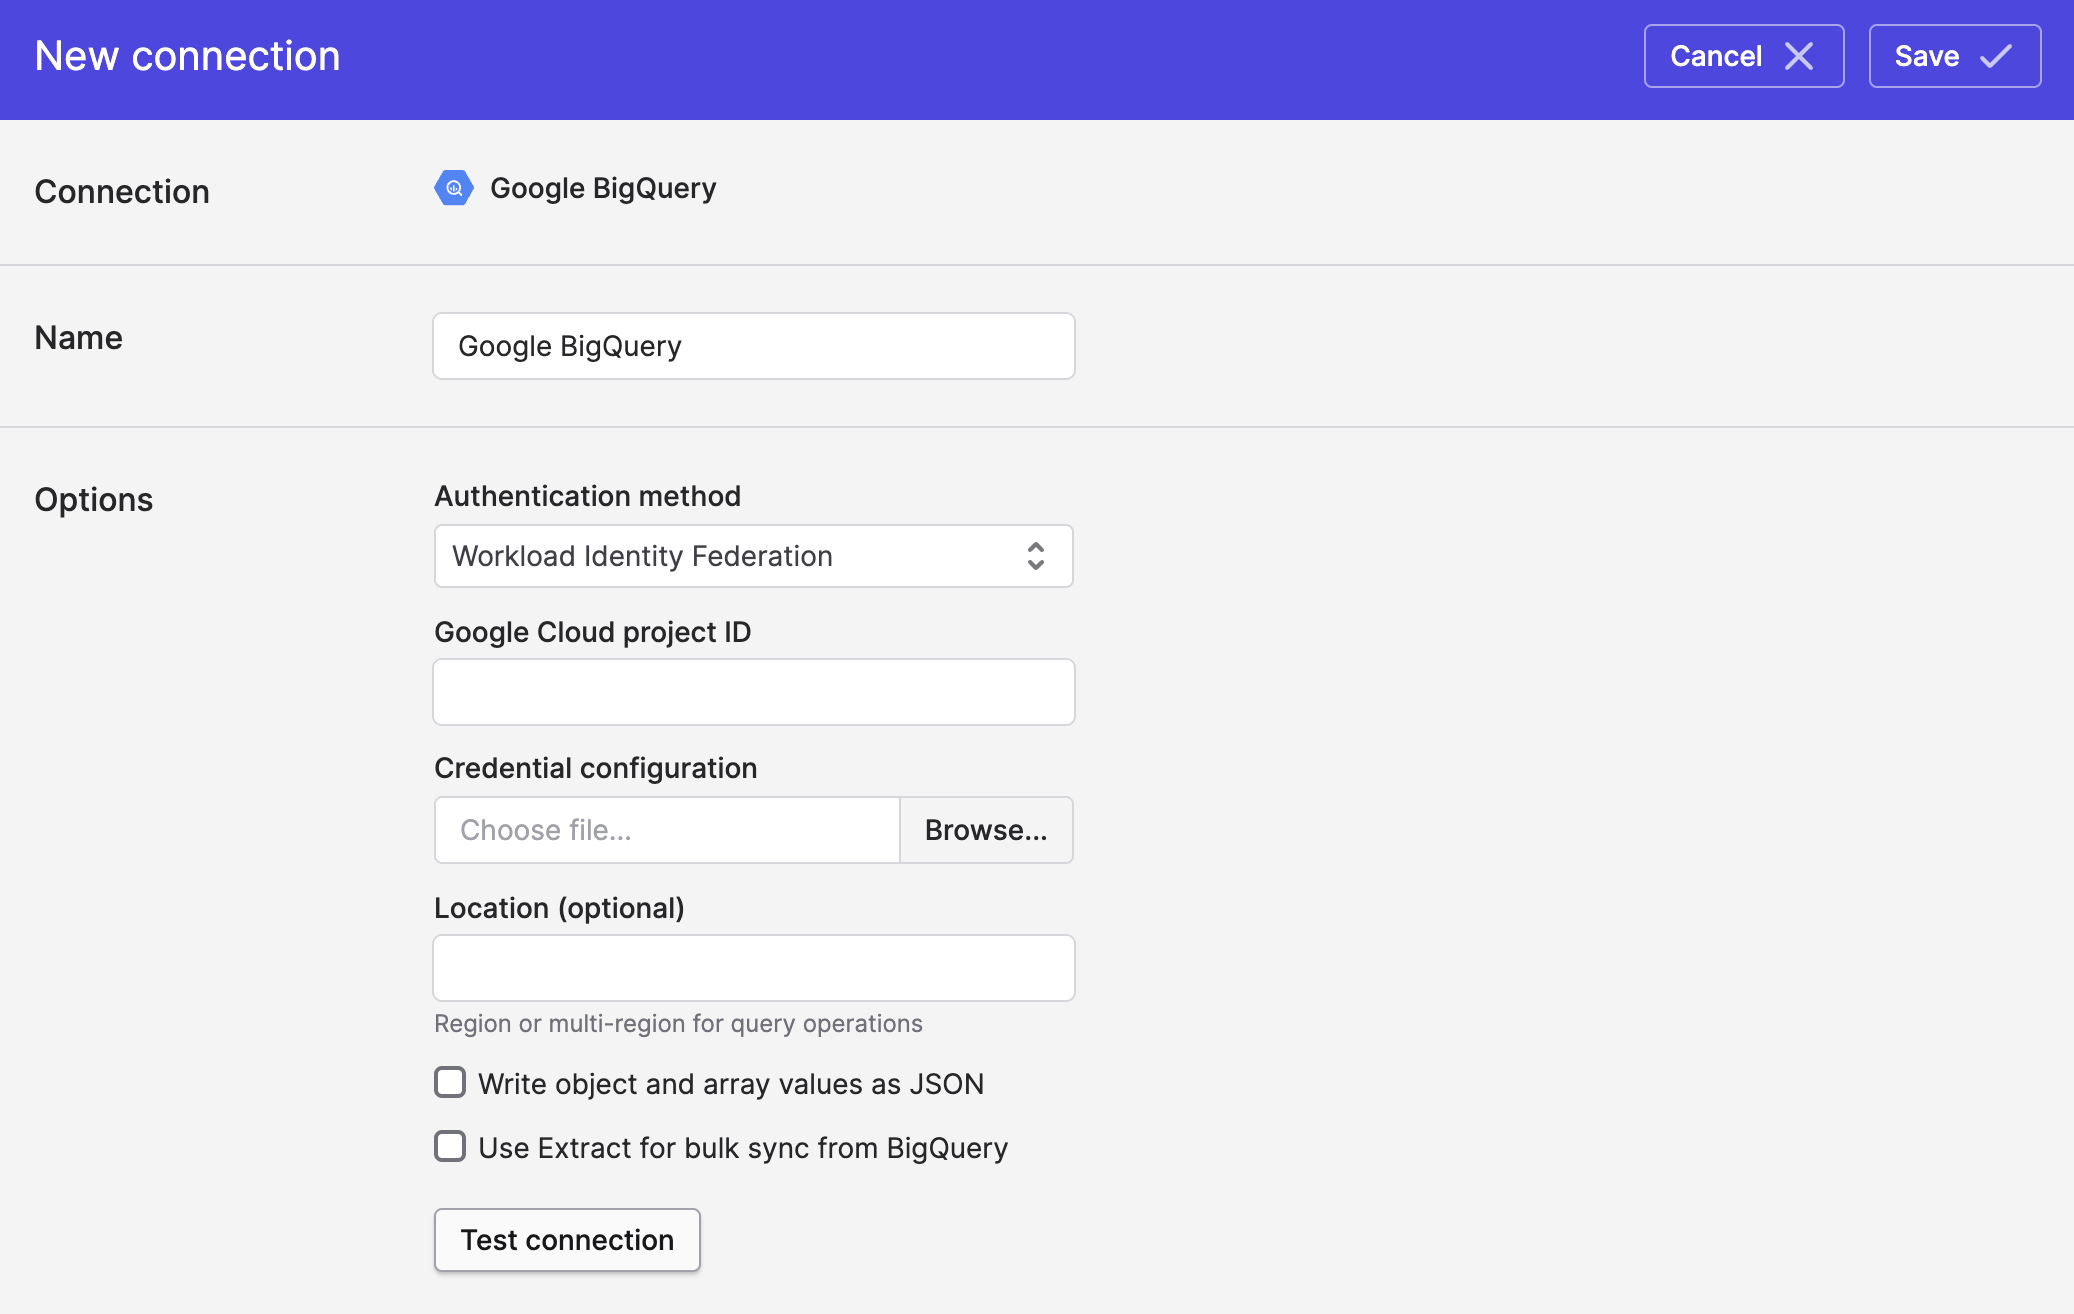
- Upload the credential configuration JSON file from Step 5 (i.e. the section above).
- Enter your Google Cloud project ID (the project containing your BigQuery datasets).
- Optionally set a Location if your datasets are in a specific region (e.g.
EU). - Click Save.
Troubleshooting
"Permission denied" when testing the connection
- Verify the Google Cloud service account has
roles/bigquery.jobUserandroles/bigquery.dataVieweron the project. - Check that the Workload Identity Pool principal has
roles/iam.workloadIdentityUseron the Google Cloud service account. - Confirm that the attribute condition (if set) matches Polytomic's actual IAM role ARN.
"Invalid grant" or token exchange errors
- Ensure the AWS account ID in the provider matches Polytomic's AWS account ID exactly. It should be
568237466542. - Verify that the credential configuration file was downloaded for the correct provider and service account pair.
Bulk sync extraction fails
- Ensure the Google Cloud service account has
roles/storage.objectAdminon the configured GCS bucket. - The GCS bucket must be in the same project or the Google Cloud service account must have cross-project access.
Updated about 1 month ago