

Redshift
Source and destination
Connecting to Redshift
-
In Polytomic, go to Connections → Add connection → Redshift.
-
Enter your cluster's Hostname, Port (default
5439), Database, and the database Username and Password for Polytomic to use. -
Choose an SSL mode. Polytomic always encrypts connections to Redshift:
verify-full(default): verify the server certificate and that it matches the hostname.verify-ca: verify the server certificate but not the hostname. Use this when connecting through an SSH tunnel, a custom DNS name, or a VPC endpoint whose name doesn't match the certificate.require: encrypt without verifying the certificate.
-
Optionally, configure an S3 bucket and AWS credentials (see S3 bucket below). A bucket is required to write to Redshift. When you configure one, Polytomic also uses it to read data with
UNLOAD, which is faster for Bulk Syncs from Redshift.
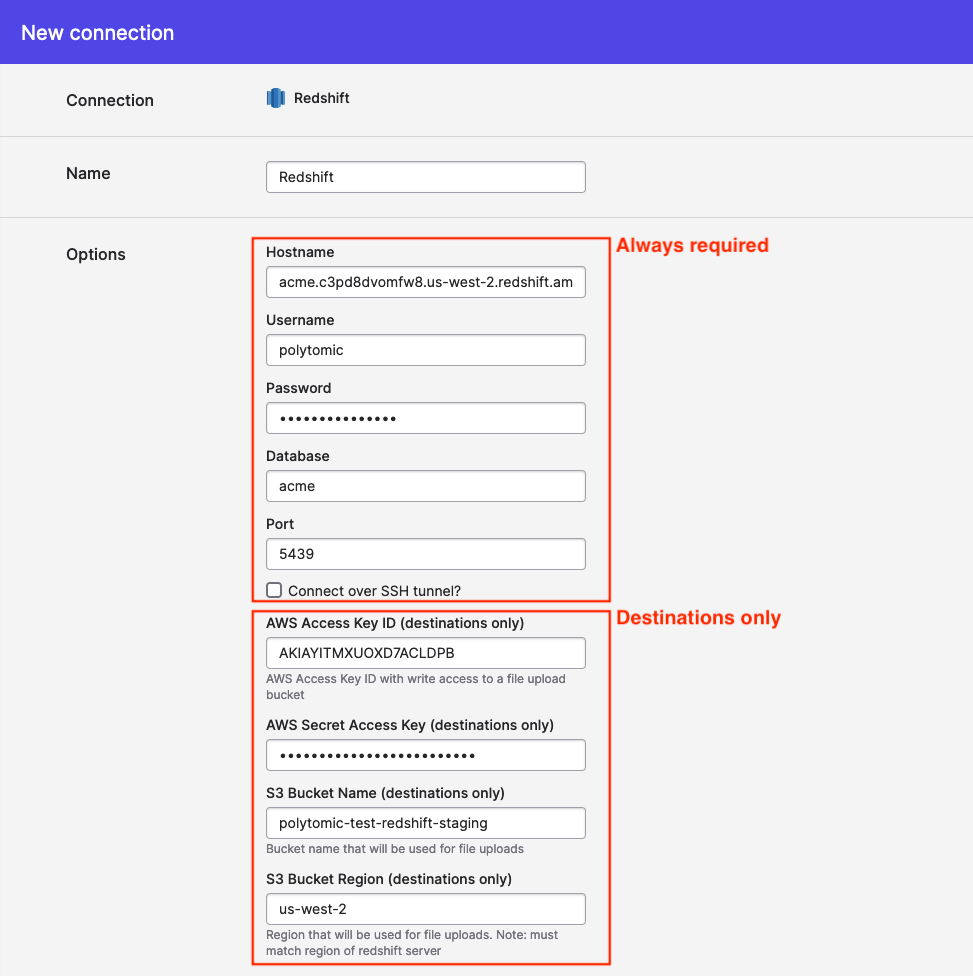
- Click Save.
Syncing from Redshift
Read permissions
The basic permissions cover what Polytomic needs to sync from Redshift (assuming your Redshift user is polytomic):
GRANT USAGE ON SCHEMA my_schema TO polytomic;
GRANT SELECT ON ALL TABLES IN SCHEMA my_schema TO polytomic;

-- Also grant SELECT on tables and views created in the future
-- (run as the user that will create them)
ALTER DEFAULT PRIVILEGES IN SCHEMA my_schema GRANT SELECT ON TABLES TO polytomic;
ALL TABLES includes views. Repeat for each schema you expect to use with Polytomic.
Syncing to Redshift
If you wish to write to Redshift, there are two requirements:
- A user with write permission to the table, schemas, or database that you want to load data into.
- An S3 bucket in the same region as your Redshift cluster, and AWS credentials (an access key or an IAM role) with read/write access to the bucket. Polytomic uses this bucket as a staging area for intermediate data. Polytomic removes the files when jobs complete. We also recommend setting a lifecycle policy on your bucket.
Write permissions
To grant general write permissions, run the queries for your connection type. These examples assume your database name is my_database.
For a standard Redshift connection with a database user named polytomic:
GRANT TEMP ON DATABASE my_database TO polytomic;
GRANT CREATE ON DATABASE my_database TO polytomic;
For a Redshift Serverless connection with a database role named polytomic:
GRANT TEMP ON DATABASE my_database TO ROLE polytomic;
GRANT CREATE ON DATABASE my_database TO ROLE polytomic;
For finer control, grant these permissions individually. Polytomic requires:
TEMPINSERT,DELETE, andUPDATEon any tables that you intend to write into (including future tables, if applicable).TRUNCATEALTERCREATEon tablesCREATEon schemasDROP
S3 bucket
Enter the S3 bucket name and S3 bucket region in the connection configuration, then choose an Authentication method: Access Key and Secret or IAM role. The credentials must have this access to the bucket:
{
	"Version": "2012-10-17",
	"Statement": [
		{
			"Sid": "PolytomicS3BucketAccessRedshift",
			"Effect": "Allow",
			"Action": [
				"s3:GetObject",
				"s3:PutObject",
				"s3:DeleteObject",
				"s3:ListBucket"
			],
			"Resource": [
				"arn:aws:s3:::your-bucket-name",
				"arn:aws:s3:::your-bucket-name/*"
			]
		}
	]
}
Access Key and Secret
Create an IAM user with the policy above and enter its AWS access key ID and AWS secret access key. Polytomic passes these credentials to Redshift in the COPY and UNLOAD statements it runs.
IAM role
Create an IAM role with the policy above and enter its ARN in IAM role ARN. Both Polytomic and your Redshift cluster use the role. Polytomic assumes it to read and write staged files, and Redshift assumes it when running COPY and UNLOAD. To set it up:
- Configure the role's trust policy to allow both Polytomic (AWS account
568237466542, with the External ID shown in the connection form) and the Redshift service to assume the role:
{
    "Version": "2012-10-17",
    "Statement": [
        {
            "Effect": "Allow",
            "Principal": {
                "AWS": "arn:aws:iam::568237466542:root"
            },
            "Action": "sts:AssumeRole",
            "Condition": {
                "StringEquals": {
                    "sts:ExternalId": "a1efa791-4530-43a0-962d-74e2ccf18309"
                }
            }
        },
        {
            "Effect": "Allow",
            "Principal": {
                "Service": "redshift.amazonaws.com"
            },
            "Action": "sts:AssumeRole"
        }
    ]
}
The External ID is your Polytomic Organization's ID. It's the same for every IAM role connection in your Organization.
- Associate the role with your cluster: in the Redshift console, open the cluster, then go to Properties → Cluster permissions → Associate IAM roles.
When you save the connection, Polytomic verifies that Redshift can assume the role.
Authenticating with IAM RolesSee Using AWS IAM roles to access S3 buckets for detailed documentation on configuring Polytomic connections with IAM roles.
Troubleshooting
If Polytomic is unable to connect to Redshift, or times out, check the following.
Public accessibility
Under Properties in the Redshift console, confirm that the cluster is publicly accessible.
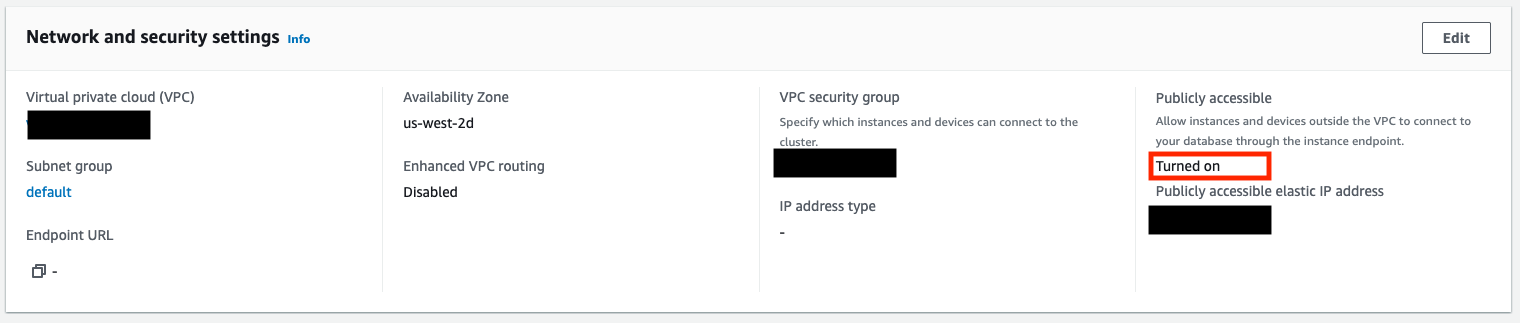
If you do not wish to make the cluster publicly accessible you will need to use an SSH tunnel to provide access.
Allow traffic to and from Polytomic
Under Properties in the Redshift console, click on the VPC security group (located under the "Network and security settings" heading). This will take you to the security group, where you can define inbound and outbound security rules for your cluster.
On the Inbound Rules, verify that either all traffic (0.0.0.0/0) is allowed, or that the Polytomic Whitelist IPs are all listed. Note that these will be entered as /32 CIDR ranges.

Under the Outbound Rules, most customers allow all outbound traffic (0.0.0.0/0); if your rules are more restrictive, ensure that the Whitelist IPs are again listed as CIDR ranges.

VPC Network ACLs
Network ACLs set for the VPC may also limit traffic to and from your Redshift cluster. For the VPC associated with your Redshift cluster, click on Network ACLs and verify that either 0.0.0.0/0 or the Polytomic Whitelist IPs are allowed for both inbound and outbound traffic.
Connecting via SSH
Polytomic supports connecting to Redshift via SSH. See Connecting via an SSH tunnel for more information.
Updated 14 days ago