Snowflake
Source and destination
Snowflake password authentication deprecated
Snowflake will be phasing out password authentication soon, so we recommend connecting Polytomic to Snowflake using key pair authentication as shown below.
Here are instructions for connecting Polytomic to your Snowflake instance:
- If you don't have a Snowflake user account for Polytomic to use, you will need to create one. See the Setting Snowflake permissions section below.
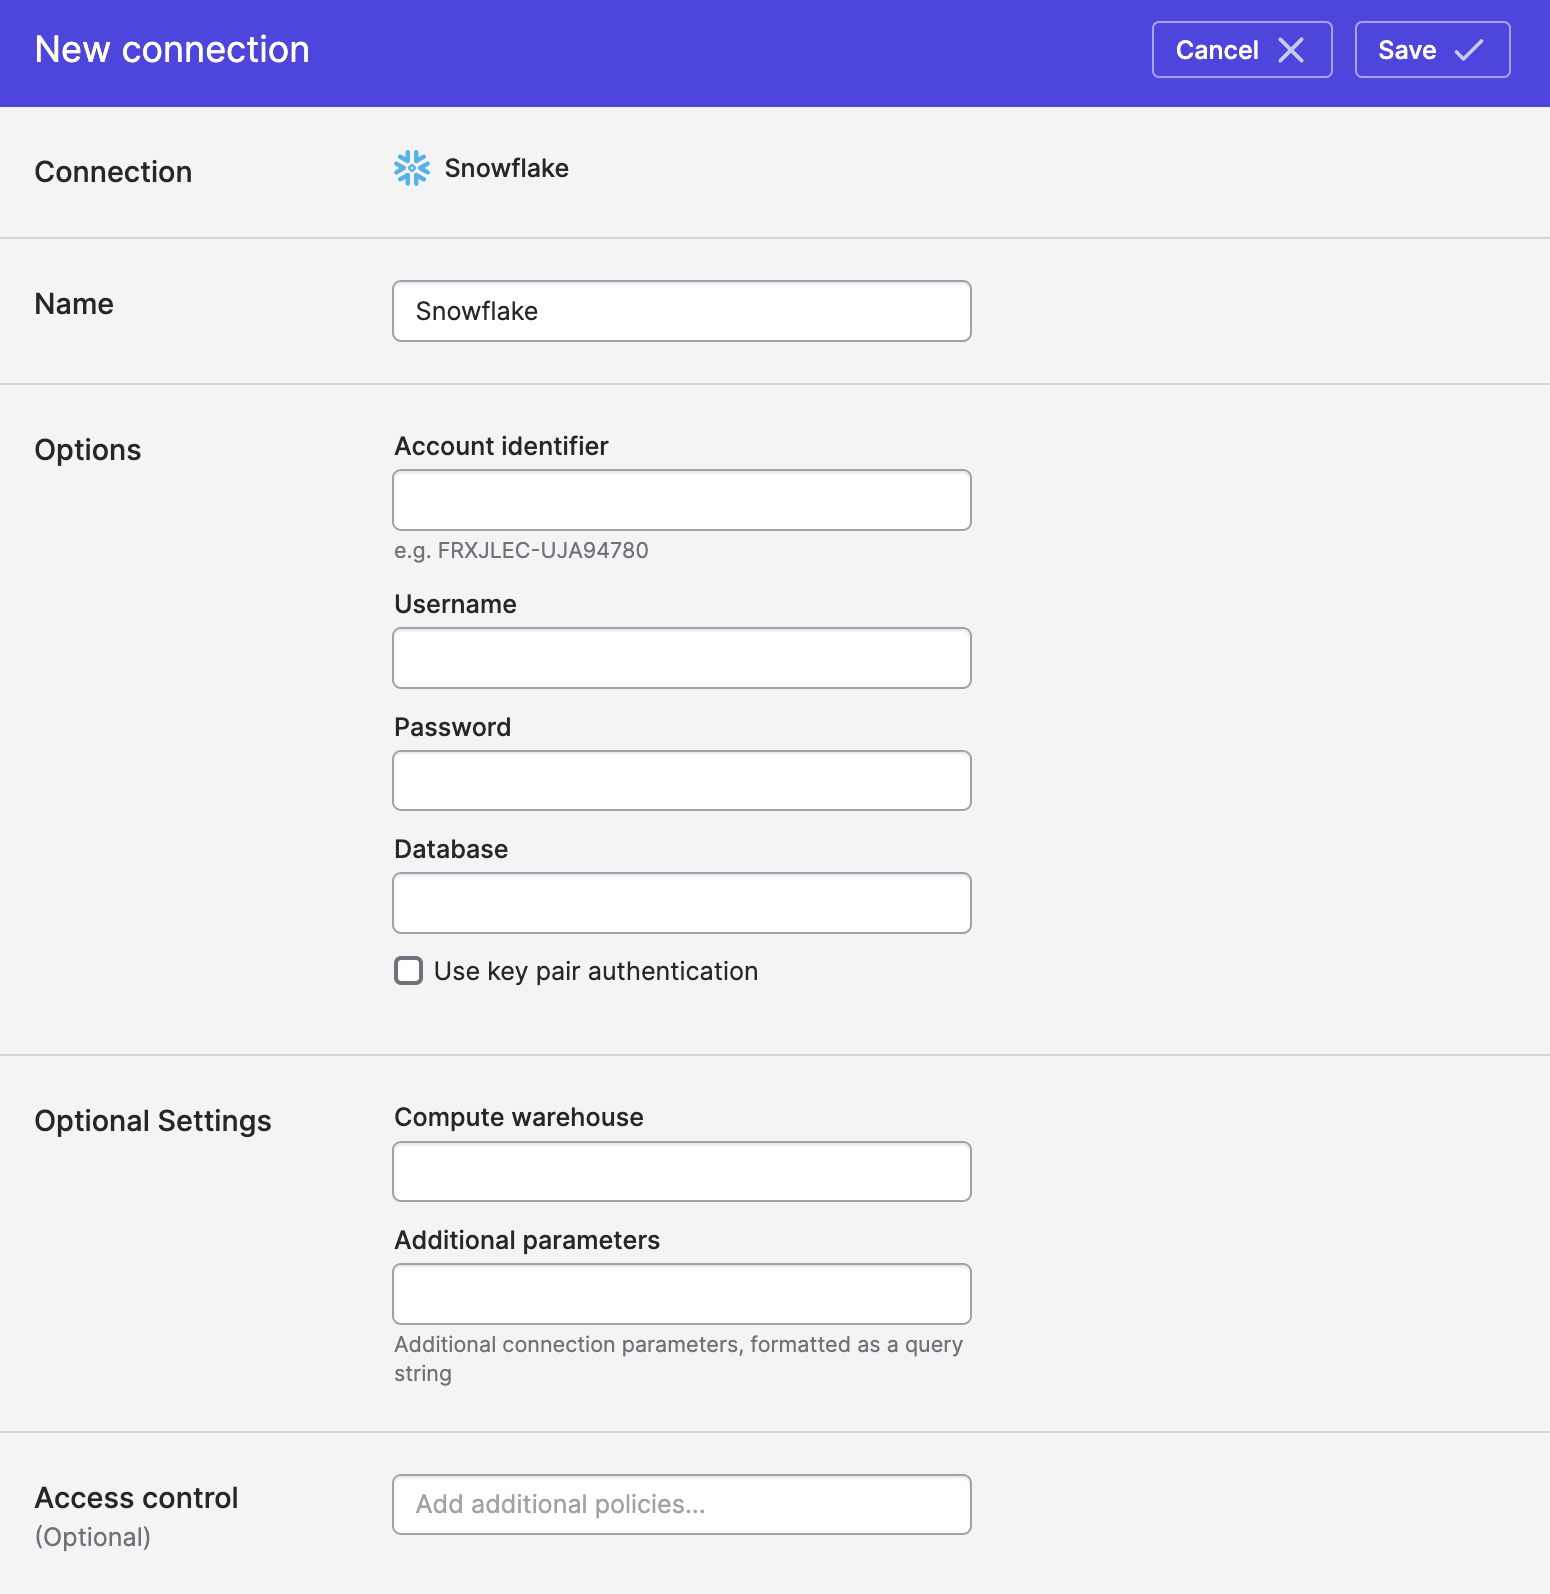
- Once you've created a user account, log in to Polytomic, then go to Connections → Add Connection → Snowflake.
- Enter your Snowflake connection parameters in the relevant fields (you can leave Password blank if you will be authenticating through a key pair).
Any additional parameters can be added through the Additional parameters field as a query string. If you leave Compute warehouse blank in Polytomic, ensure that a default warehouse is set for the user in your Snowflake admin console. We strongly recommend you use key pair authentication.
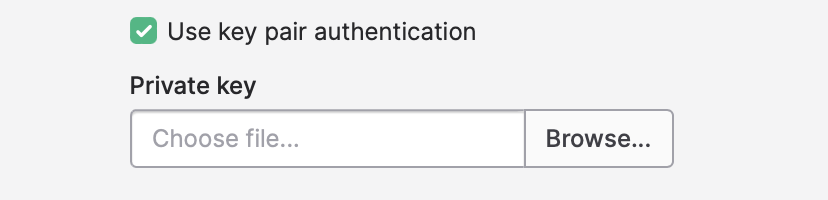
To use key pair authentication, tick the Use key pair authentication box above and upload the user's private key (make sure to generate your key pair by following Snowflake's instructions):
- Click Save.
Troubleshooting connection issues
If saving the connection results in an error, you can try and determine which part of your configuration is wrong by logging into the Snowflake web console and verifying the names of your database, schema, and compute warehouse.
To log into your Snowflake web console, take your account ID and create a URL that looks like this:
https://<accountid>.snowflakecomputing.com/console/login. You can log in using the username and password you supplied above.
Setting Snowflake permissions
The sections below contains queries to run in your Snowflake console to set permissions for Polytomic to operate. They should be followed in-order (though you can skip steps if you already have resources you want Polytomic to reuse).
The resource names used (POLYTOMIC_ROLE, POLYTOMIC_DB, POLYTOMIC_WH, etc) can be replaced with ones of your choosing.
1. Create a role
Giving Polytomic its own role allows you to better control the permissions assigned to the Polytomic user under this role. You can create a role as follows:
use role securityadmin;

create role if not exists POLYTOMIC_ROLE;
grant role POLYTOMIC_ROLE to ROLE SYSADMIN;
We assign the Polytomic role to SYSADMIN in order to also give your Snowflake admins access to this role.
2. Create a user under the above role
This is the user that Polytomic will access your warehouse with. You can skip specifying a password if you want Polytomic to use key pair authentication with Snowflake.
create user if not exists POLYTOMIC
password = 'your-own-super-secure-password'
default_role = POLYTOMIC_ROLE
default_warehouse = POLYTOMIC_WH;

grant role POLYTOMIC_ROLE to user POLYTOMIC;
3. Create a warehouse and grant access to the Polytomic role
Creating a dedicated warehouse will ensure your Polytomic jobs execute without load issues:
create warehouse if not exists POLYTOMIC_WH
  warehouse_size = large
  warehouse_type = standard
  auto_suspend = 300
  initially_suspended = true;

grant USAGE
  on warehouse POLYTOMIC_WH
  to role POLYTOMIC_ROLE;
If, instead of creating a dedicated warehouse, you choose to use an existing warehouse, be sure to grant the Polytomic role USAGE permission to it:
grant USAGE
  on warehouse <existing warehouse>
  to role POLYTOMIC_ROLE;
4. Create a database and grant access to the Polytomic role
The last step is to create a database and grant the Polytomic role access to it. For read-only access you can skip the CREATE SCHEMA permission:
create database if not exists POLYTOMIC_DB;

grant CREATE SCHEMA, MONITOR, USAGE
   on database POLYTOMIC_DB
   to role POLYTOMIC_ROLE;
Optional: restricting Polytomic to viewing certain schemas only
If you want to restrict Polytomic to certain schemas of your choosing (this is rare), you can run this query for each schema that you wish Polytomic to access:
-- Repeat this for each schema that you wish Polytomic to access
grant usage on schema $existingSchemaName to POLYTOMIC_ROLE;
grant select, insert, update on all tables in schema $existingSchemaName TO POLYTOMIC_ROLE;
Optional: allow Polytomic to write to existing schemas
If you are using Polytomic to sync to an existing Snowflake schema that Polytomic did not create, you will need to set these permissions:
-- Repeat this for each schema that you wish Polytomic to write to

-- Allow Polytomic to create its own file format
GRANT CREATE FILE FORMAT ON SCHEMA $existingSchemaName TO POLYTOMIC_ROLE;

-- Allow Polytomic to update its own file formats in the future
GRANT ALL ON FUTURE FILE FORMATS IN SCHEMA $existingSchemaName to role POLYTOMIC_ROLE;
Permissions Troubleshooting
Snowflake tables do not show up in Polytomic (model editor, destination list, Query Runner)
The Polytomic role that the user falls under needs to have the following permissions:
USAGEon the relevant schemasSELECTon the relevant tables
Additional, verify that no schema parameter is set in the Additional parameters Polytomic Snowflake connection field, as that instructs the Polytomic user to only access the specified schema.
Syncing to Snowflake
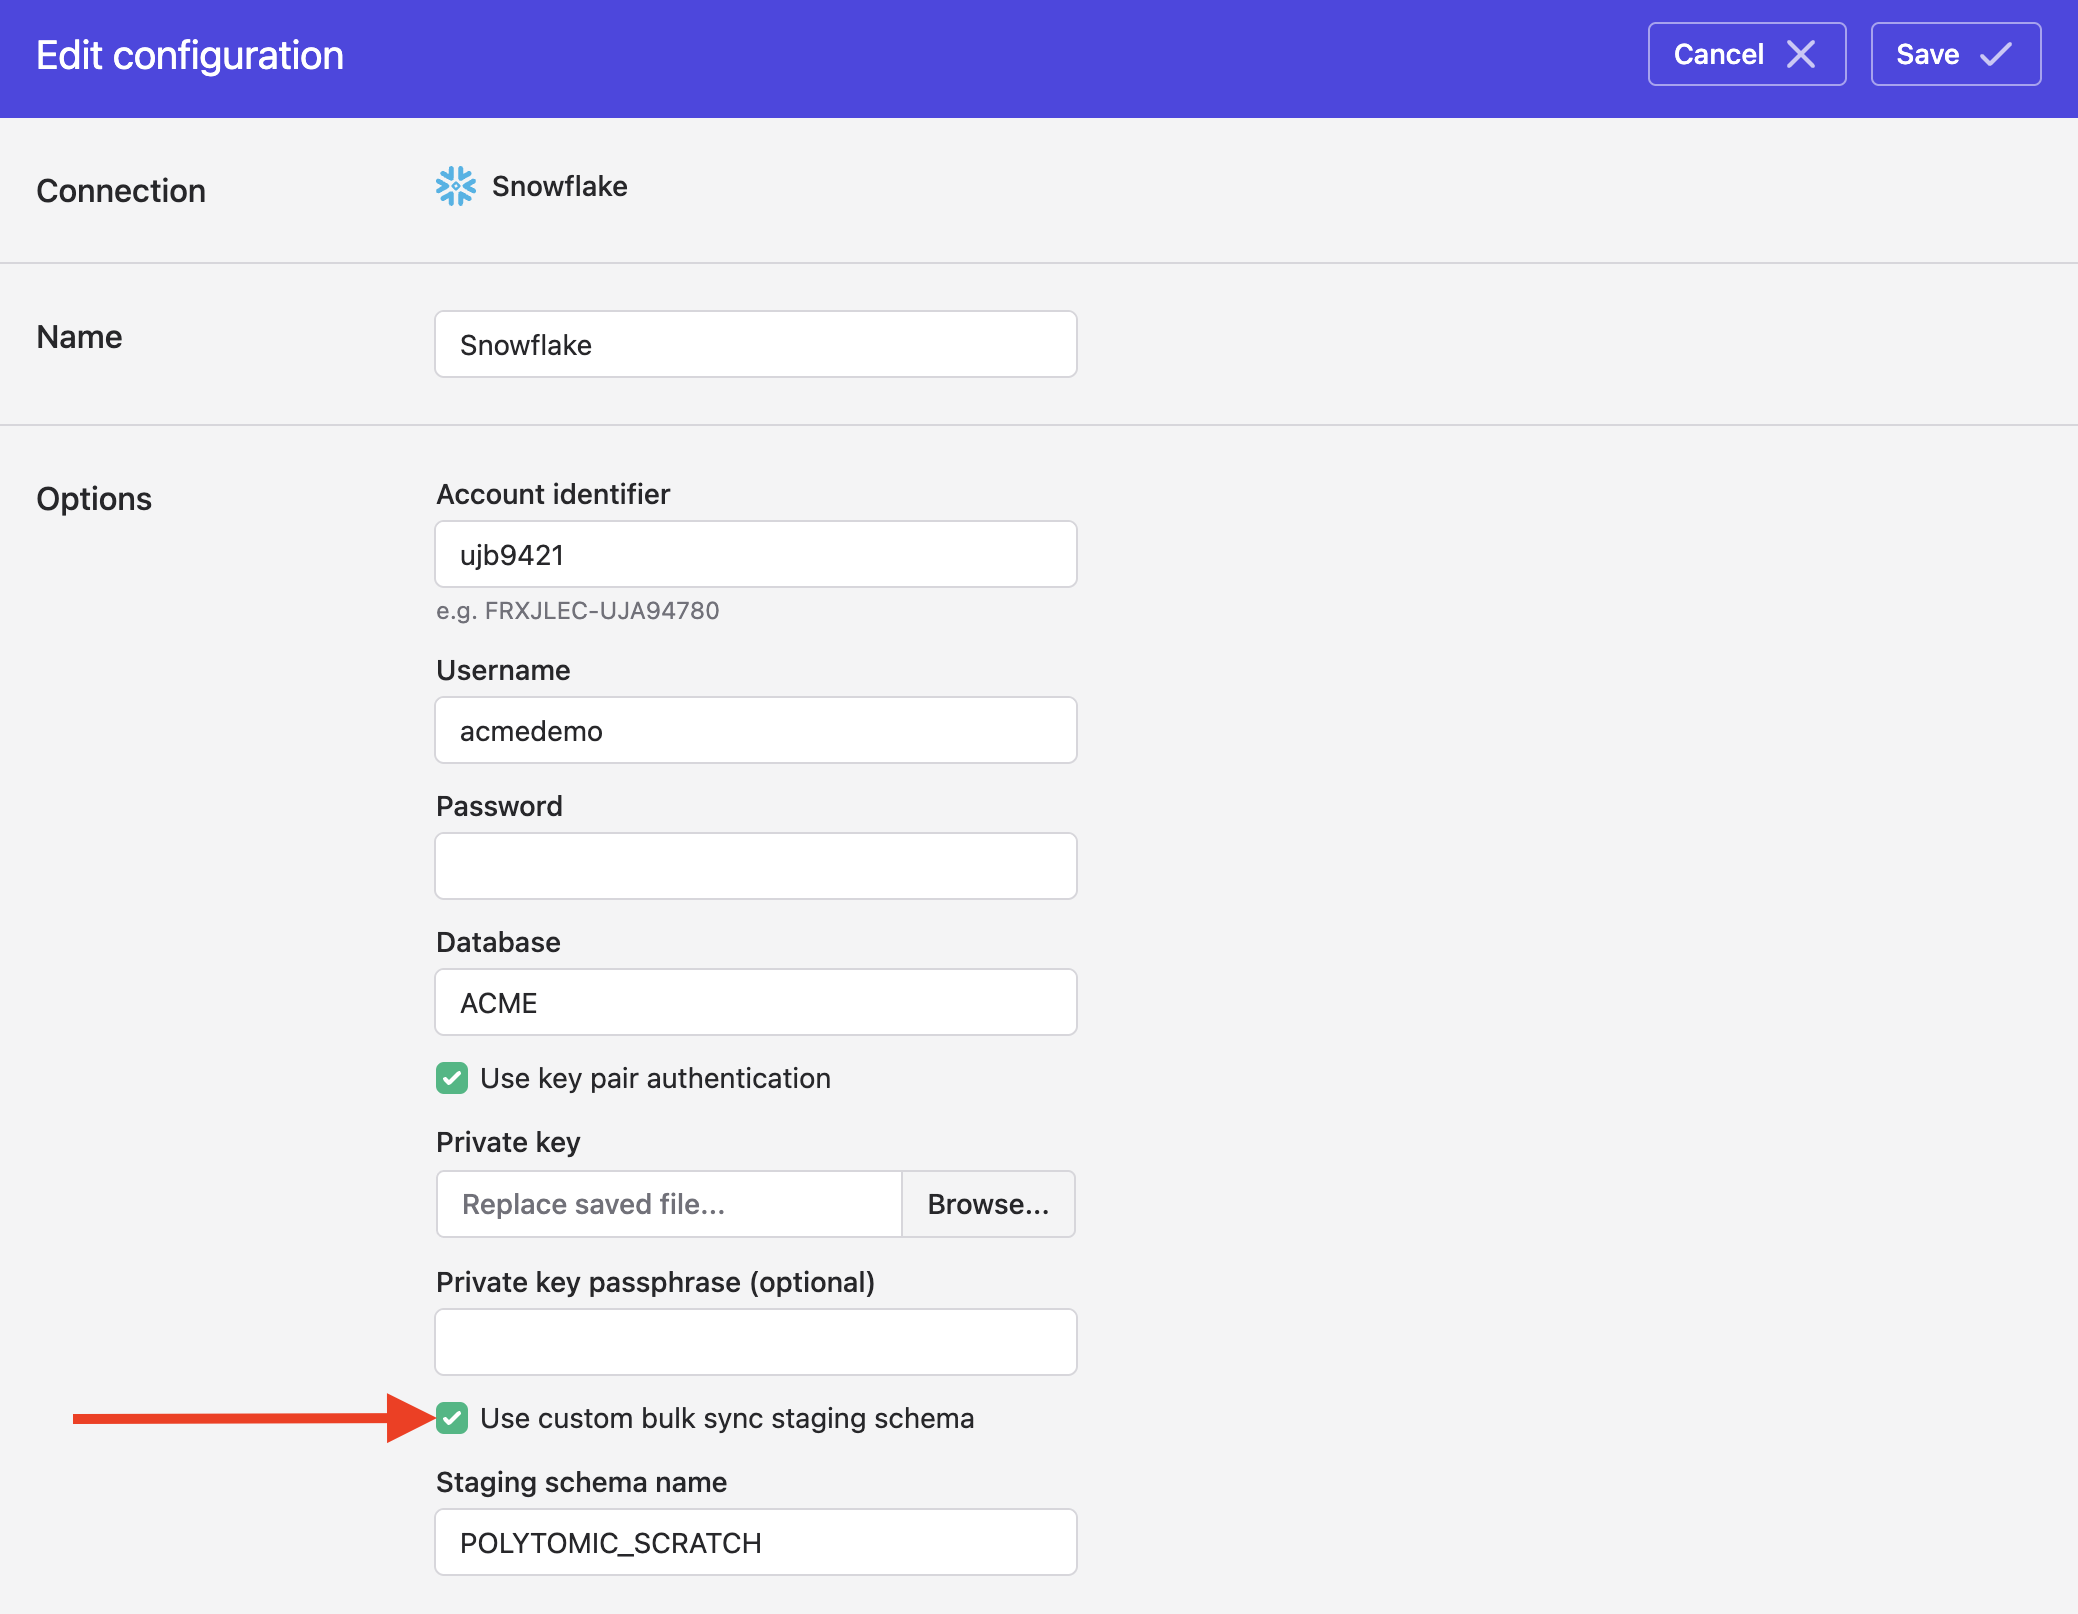
Custom scratch schema
When syncing to your Snowflake instance, Polytomic will sometimes generate temporary tables during a sync. These tables are automatically removed when the sync completes.
You can specify a specific schema for Polytomic to generate these temporary tables in. To do so, turn on this setting in your Snowflake connection and enter your desired schema for Polytomic's temporary tables. Ensure that the Polytomic Snowflake user has the above permissions for this schema.
Creating tables as transient
When syncing to Snowflake, Polytomic's default behaviour is to create all tables as Fail-safe. For those who want to save on Snowflake storage and its costs, you can set Polytomic to write tables as transient instead. Transient tables are cheaper because, unlike the default Fail-safe tables, they cannot be restored from a backup within Snowflake in case of operational failures (however you can always resync them with Polytomic).
You can set this through the Advanced settings section at the bottom of your Bulk Sync configuration. Different syncs can have different settings here, so you can have some syncs write transient tables while others default to writing Fail-safe ones.
If you turn this on for existing tables, make sure to run a full resync for the setting to take effect.
Updated 2 months ago